This article is in continuation to the article Single character LCD
display using AVR. The aforesaid article shows how to display a single
letter on LCD. Moving forward towards learning to work with LCD, this
article explains how to display a string on LCD. Displaying string is
occasionally used in many applications.
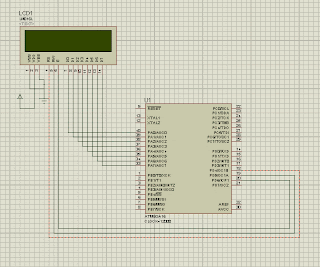
The connection of the LCD with the AVR microcontroller (ATmega16) is shown in the circuit diagram.
#define F_CPU 8000000
#include <avr/io.h>
#include <util/delay.h>
#define dataport PORTA
#define commport PORTD
#define rs PD4
#define wr PD5
#define en PD6
int LCD_init(void);
int LCD_SendData(void);
int wrcomm(void);
int wrdata(void);
int main(void)
{
DDRA = 0xFF; //Setting PortA as output port
DDRD = 0x70; //Setting PortD 4, 5, 6 pin as output pins
LCD_init(); //Initialise LCD
LCD_SendData( ); //Write to LCD
return 1;
}
int LCD_init()
{
dataport = 0x38; //initialize LCD 2 lines, 5x7 matrix
wrcomm(); //Right the command byte to command register
dataport = 0x01; //Clear LCD
wrcomm(); //Right the command byte to command register
dataport = 0x0E; //Display on Cursor Blinking
wrcomm(); //Right the command byte to command register
dataport = 0x80; //Cursor at line 1, position 1
wrcomm(); //Right the command byte to command register
dataport = 0x1C; //Shift Entire Display To Right
wrcomm(); //Right the command byte to command register
return 1;
}
/*********** **** <<Sending Data To LCD Display>> ************ ***/
int LCD_SendData(void)
{
unsigned char j[] = " PROELX TEST";
int i;
for(i = 0; i < sizeof j; i++)
{
dataport = j[i];
wrdata();
}
return 1;
}
/******* <<Righting the command byte to command register>> ********/
int wrcomm(void)
{
commport &= ~(1 << rs); //Setting RS = 0, selecting command register
commport &= ~(1 << wr); //Setting RW = 0
commport |= (1 << en); //EN = 1
commport &= ~(1 << en); //EN = 0, thus giving high to low pulse on Enable pin
_delay_ms(10); //10ms delay
return 1;
}
/********** <<Righting the Data byte to Data register>> **********/
int wrdata(void)
{
commport |= (1 << rs); //Setting RS = 1, selecting data register
commport &= ~(1 << wr); //Setting RW = 0
commport |= (1 << en); //EN = 1
commport &= ~(1 << en); //EN = 0, thus giving high to low pulse on Enable pin
_delay_ms(10) ; //10ms delay
return 1;
}

No comments:
Post a Comment